New to Crypto-Currency

If you’re new to crypto-currency, follow this link to get yourself signed up for a free wallet and get a $10.00 bonus after depositing $100. https://www.coinbase.com/join/5a457a7c7b4f800140d292b0

Posted in CryptoCurrency, Uncategorized | Leave a comment

New CryptoWall 3.0 surfaces

A new wave of CryptoWall attacks have shown up in e-Mails containing social engineering attacks call Phishing attacks. These e-Mails have .chm files attached that carry the malware infection into the network.  A .chm file is a file type used for publishing Help documents in applications.  CryptoWall 3.0 is the latest version of ransom-ware that encrypts your files and then demands a fee to recover your data.

Back in September of 2013, CryptoLocker produced 27 Million dollars in ransom within the first 3 months of existence. CryptoWall and CryptoLocker usually infects users by attaching itself to e-mails and making itself look like something legitimate, like a UPS or FedEx delivery report, a Scan or Fax from your office machine, or in the latest version, an incoming fax report. The attached files are usually nested inside of a .Zip file.

Once a user is fooled into executing the attached file, the virus encrypts files on your computer and files on mapped drives and then demands that you pay hundreds of dollars by MoneyPack or BitCoin for a decryption key.

Ask yourself right now, “Am I sure that I am protected against this type of threat?”  If you are not sure that your network is protected against the damage that CryptoWall 3.0 can do – call 310 464-2387 now and let’s discuss how we can protect your network and your data from being destroyed beyond recovery.

Posted in Security | Tagged , , , | Leave a comment

Install Netflix on Apple iPad 1 with iOS 5.1.1

I recently helped a neighbor who bought an Apple iPad 1 running iOS 5.1.1 for his daughter so that she could watch Netflix. He was worried that he wasted his money because he was unable to install the Netflix App.  When attempting to install the App from the App store, the install would not complete and said it wasn’t compatible with his version of iOS.

The solution was to login to iTunes with his Apple ID and then search for the Netflix app. Once we located the Netflix app, we clicked on the “Get” button. Netflix downloaded to iTunes on his computer.

We then returned to the iPad which is logged in with the same Apple ID and searched for Netflix in the App Store. This time, when we go to install the App, it says that an older version of the App is available and asks you if you’d like to install it. Press Yes and get ready to enjoy Netflix on your old Apple iPad 1 w/ iOS 5.1.1

Please note that you are NOT syncing the app from iTunes to the iPad. The iPad doesn’t need to be connected to the computer running iTunes for this to work.  You will simply be given he option to download the older version of the App on the iPad 1 running iOS 5.1.1 after you’ve installed it in iTunes while logged into iTunes with your Apple ID.

So now that you’re enjoying Netflix on your iPad 1, what should you do now?  Here is what you do – buy an Android or Windows tablet next time because they will automatically offer you the version of the App that IS compatible with your equipment.

Posted in Tutorial | Tagged , , , , , | Leave a comment

SQL Server 2008 Enterprise Evaluation Expired

Problem: SQL Server Service will not start due to expiration of evaluation period.

Desire: To obtain some “grace” for the evaluation period and then add a License Key.

Remedy: You’re going to need to acquire a License Key for the same version or later and then perform an Edition Upgrade (if you’re staying with same Version) or run Version Upgrade (if you’re going to upgrade from 2005 to 2008 or 2008 to 2008 R2, etc) from your installation media.
Barrier is – upgrade will fail on SQL Service Health Check because the SQL Service will not start since it’s been deactivated – OK, NOW WHAT?!  My solution to obtaining some “grace” on the activation period was to disable the network adapter, roll the system time back to a date that was within the Evaluation period and RESTART the server.  After the restart, Check to see that your SQL Service started and then run the upgrade from your installation media.
After setup completes, set the time back to current, enable your network adapter and restart the computer.

Posted in Uncategorized | Leave a comment

How to install vSphere Client 5.0 on Windows 8

  1. Extract the installation package for VMware-viclient-all-5.0.0-######.exe using 7-Zip.
  2. Go to the “redist\dotnet” folder from the package you extracted and install dotnetfx35.exe.  If prompted, let it download and install additional files.
  3. Go to the “redist\viresist” folder from the package you extracted and install vjredist64.exe for 64 bit Windows or vjredist32.exe for 32 bit Windows.
  4. Go to the “bin” folder from the package you extracted and right click on VMware-viclient.exe and then “Properties”
  5. Go to the “Compatibility” tab and select “Run this program in compatibility mode for:” and then select “Windows 7″ –  Click “Ok”
  6. Now go ahead and install “VMware-viclient” normally.

If this doesn’t work for your, download the VSphere Client for 5.1 Update 2 which will install on Windows 8 natively.

Posted in Technical | Tagged , , | Leave a comment

How to get a Cisco 7941/7961 Message Indicator light working in asterisk!

I recently had the pleasure of trying to make the message indicator light work in several of our asterisk boxes for our Cisco phones. Chances are you may share the same frustration of trying to get this seemingly simple feature working.

So we will keep it very simple:

First off, I recommend firmware version 8.3.1. It’s the version we use and it seems to have the least bugs out of all the releases for these phones. Most new features seem to cater to Cisco CallManager features more than they do Asterisk, so let’s forget all about any versions after 8.3.1 for now!

Second, you will need to edit SEP$MAC.cnf.cml ($MAC being the mac address of your phone) and find the line that has this key:


<messageWaitingLampPolicy>0</messageWaitingLampPolicy>

You will want to change this to 1. There are more options that allow you to fine-tune this, however, I find this best. 1 will make the envelope blink next to the line that has a new voicemail, and will make that light shine so bright!

Now, we have one more step to make this work properly, which can be done two ways:

  • Edit sip_custom.conf and add the following line:

buggymwi=yes

Save the file, reload asterisk.

OR:

  • In FreePBX, click on the tools tab, go into SIP Settings (where you change up the NAT settings) and at the very bottom of the page, put in the above setting in the field for extra SIP options. Save, and reload.

You will almost immediately see a change if you already rebooted the phone, if not, well, reboot your phone!

Now go ahead and leave a voicemail and watch the indicator light up!


Some additional notes: You may notice a strange behavior where your dial tone will blip on and off when you start a new call if you have voicemail. This is intended and set as a default in some configs. If you find this annoying, go ahead and open up your SEP$MAC.cnf.xml file and find the following line:

<stutterMsgWaiting>1</stutterMsgWaiting>

and change it to 0. Reboot the phone, and the behavior should go away.


If you have any questions or comments, feel free to leave a few comments.

Posted in Cisco, Informational, Technical, Tutorial, VOIP | Leave a comment

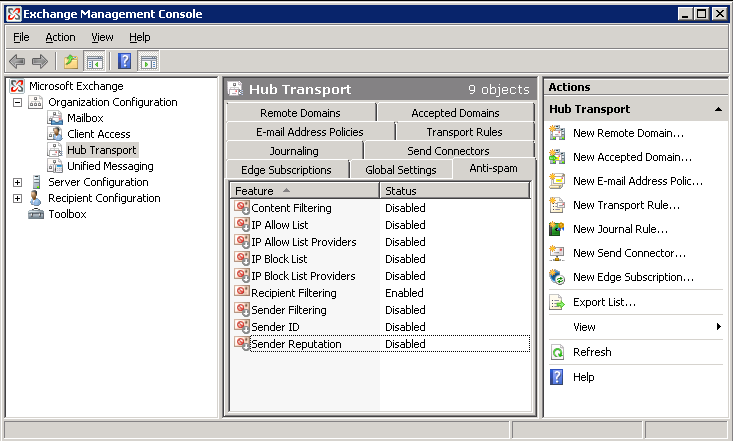
How to Disable Anti-Spam (spam filtering) in Microsoft Exchange Server 2007

A client of ours who subscribes to our Spam Filtering service recently reported that a message from a vendor of theirs was rejected.  We checked our message audit logs and discovered that the message in question was tested by our service and forwarded normally to their Exchange 2007 server.

Further investigation revealed that the message was rejected by their Microsoft Exchange 2007 server’s Anti-Spam feature with message:
550 5.7.1 message rejected as spam by content filtering.

Since we are filtering their e-mail, they no longer need the Anti-Spam services of the Exchange Server, so here is how we disabled it.

  1. Launch the Exchange Management Console
  2. Expand Organization Configuration
  3. Choose Hub Transport
  4. Select the Anti-Spam tab
  5. Highlight each feature (except recipient filtering), right click on it and then click “Disable.”
    1. We left Recipient filter enabled because it is meant to prevent reverse NDR attacks.

      Disable Exchange Server 2007 Anti-Spam

      Exchange Server 2007 Management Console
      Organization Configuration>Hub Transport>Anti-Spam


Posted in Exchange Server, Technical | Tagged , | Leave a comment

Reinstall applications deployed via GPO Group Policy

Reinstall applications deployed via GPO Group Policy

If an application that was deployed via group policy (GPO) is uninstalled using Add/Remove programs (appwiz.cpl), it will not be automatically reinstalled via GPO Group Policy processing on the next restart.

When an application is installed via GPO Group Policy on a client computer, a subkey is created at the following registry key:
HKEY_LOCAL_MACHINE\SOFTWARE\Microsoft\Windows\CurrentVersion\Group Policy\AppMgmt

In order to force the reinstallation of software that was previously deployed via Group Policy, locate the subkey that contains values describing the software that you’d like to have reinstalled and delete it.

After removing the key from the registry of the client computer, run the command “gpupdate /force” from a run prompt or command line and then restart the computer.

Posted in GPO Group Policy, Technical | Tagged , , , | Leave a comment

“Auth Fail” when upgrading Cisco 7941/7961 firmware

“Auth Fail” message received when upgrading the firmware on a Cisco 7941/7961 phone.

While attempting to convert a couple of Cisco 7941G phones from the SCCP-8-5-4  to SIP, I encountered an “Auth Fail” message after performing a factory reset on the phone.  The “Auth Fail” message was displayed while attempting to download the term41.default.loads file.  If you haven’t reset the phone, you can encounter the error when the phone is attempting to download the SEP{mac}.cnf.xml file.

We use as Asterisk based distribution and attach Cisco station phones by converting from SCCP firmware to SIP firmware.

It turns out that the latest SCCP firmware is unable to authenticate the latest SIP image that I’m trying to install on the phone.  In order to get past this, you’ll need to downgrade the phones current SCCP firmware to sip.8-5-2.  After that, you can upgrade to the another version if you like.

Download “cmterm-7941_7961-sip.8-5-2.zip” from Cisco’s website.  You’ll need a Cisco account to download the files, but the account is free.  The steps to find the firmware appear below and are referenced from: http://www.cisco.com/en/US/docs/voice_ip_comm/cuipph/firmware/8_5_2/english/release/notes/7900_852.html

Step 1 Go to the following URL: http://tools.cisco.com/support/downloads/pub/Redirect.x?mdfid=278875240

Step 2 Log in to the Tools and Resources Download Software page.

Step 3 Choose the IP Telephony folder by clicking +.

Step 4 Choose Call Control > Cisco Unified Communications Manager (CallManager).

Step 5 Choose your Cisco Unified Communications Manager version.

Unzip the 8-5-2 firmware into your tftp directory and overwrite the term41.default.loads and term61.default.loads.  Reset the phone and it will load the term41.default.loads file.  The term41.default.loads file will cause the phone to “upgrade” to the 8-5-2 firmware.  When the phone reboots from the firmware update, it will load the SEP{mac}.cnf.xml.  This is where you want to specify the firmware version that you’d like to end up with.  This time, you won’t get the ”Auth Fail” error.

Posted in Cisco, Technical, VOIP | Tagged , , , , | Leave a comment

Tuning SBS 2008 (Small Business Server 2008) to free up disk space

Windows Small Business Server 2008 (SBS 2008) out of the box needs optimizations that, without regular maintenance and supervision, will consume all of your disk space in several places.

In this article, we will cover the tuning and optimization of WSUS in SBS 2008 to free up disk space consumption.  Some of the tips below should be repeat every several months to reclaim disk space.  Here is a summary of topics:

  1. IIS Logging for WSUS
  2. SQL Server Database “SBSMONITORING”
  3. SBSMonitoring_log.LDF size reduction
  4. (Coming) Updates Synchronization settings in “Windows Server Update Services” manager
  5. Reducing the size of Windows\winsxs Folder
  6. Cleanup the Licensing Logs for SBS 2008

IIS logging for WSUS is a hidden disk eating culprit, so we’ll address this one first.

These files are typically found in: “%SystemDrive%\inetpub\logs\LogFiles\W3SVC1372222313″  My suggestion is to disable logging for WSUS and delete these log files.  To do so:

  1.  Open IIS Manager
  2. Navigate to “Sites” and then ”WSUS Administration”
  3. Click the ”Logging” icon
  4. On the right hand column, click “Disable”
  5. Close IIS Manager
  6. Open Explorer and navigate to “%SystemDrive%\inetpub\logs\LogFiles\W3SVC1372222313″
  7. Delete the contents of this directory to reclaim disk space

Another disk eating culprit is the “SBSMONITORING” SQL Database.

This database will eventually grow to 4GB where it reaches its limit.  You may notice “sqlservr.exe *32″ process takes a lot of processor time when the database grows large and may also notice that Status & Alerts in Windows SBS Console take a long time.

  1.  Log on with a user that has administrative privileges.
  2. Start SQL Server Management Studio. (Express edition works) in elevated mode by right clicking and then clicking “Run as Administrator”
  3. Attach to SBSMONITORING instance (replace SERVERNAME with the name of your server):
    Server Type: Database Engine Server
    Name: SERVERNAME\SBSMONITORING Authentication: Windows Authentication
  4. Once connected, from the Menu, click: File -> New -> Query with Current Connection. This creates a new query window.
  5. To prevent your database from outgrowing it’s 4GB size limitation, Copy the commands below into the query window, then press F5 to execute:USE SBSMonitoring UPDATE [SBSMonitoring].[dbo].[Settings] SET [Value] = 30 WHERE [Name] = ‘CleanupPeriod’ EXECUTE [SBSMonitoring].[dbo].[CleanupDatabase] CREATE NONCLUSTERED INDEX [_SBS_BLOG_index_WMICollectedData_5_K4_K1_K5_2] ON [dbo].[WMICollectedData] ([WMIPropertyID] ASC,[ID] ASC, [WMIInstanceID] ASC) INCLUDE ( [DateCollected]) WITH (SORT_IN_TEMPDB = OFF, IGNORE_DUP_KEY = OFF, DROP_EXISTING = OFF, ONLINE = OFF) ON [PRIMARY] CREATE NONCLUSTERED INDEX [_SBS_BLOG_index_Reports_5_K2_K3_1_4] ON [dbo].[Reports] ([ConfigurationID] ASC, [DateGenerated] ASC) INCLUDE ([ID], [Data]) WITH (SORT_IN_TEMPDB = OFF, IGNORE_DUP_KEY = OFF, DROP_EXISTING = OFF, ONLINE = OFF) ON [PRIMARY] CREATE NONCLUSTERED INDEX [_SBS_BLOG_index_WMICollectedData_5_K2D_K4_K5] ON [dbo].[WMICollectedData] ([DateCollected] DESC, [WMIPropertyID] ASC, [WMIInstanceID] ASC) WITH (SORT_IN_TEMPDB = OFF, IGNORE_DUP_KEY = OFF, DROP_EXISTING = OFF, ONLINE = OFF) ON [PRIMARY] CREATE INDEX [_SBS_BLOG_index_Alerts_8_7_] ON [SBSMonitoring].[dbo].[Alerts] ([DefinitionID], [ComputerID]) INCLUDE ([DateOccured]) CREATE STATISTICS [_SBS_BLOG_stat_WMICollectedData_5_1_4] ON [dbo].[WMICollectedData]([WMIInstanceID], [ID], [WMIPropertyID]) CREATE STATISTICS [_SBS_BLOG_dta_stat_WMICollectedData_4_1_5_2_3] ON [dbo].[WMICollectedData]([WMIPropertyID], [ID], [WMIInstanceID], [DateCollected], [StatusID]) CREATE STATISTICS [_SBS_BLOG_dta_stat_WMICollectedData_5_1_3_4] ON [dbo].[WMICollectedData]([WMIInstanceID], [ID], [StatusID], [WMIPropertyID]) CREATE STATISTICS [_SBS_BLOG_dta_stat_WMICollectedData_5_4_2] ON [dbo].[WMICollectedData]([WMIInstanceID], [WMIPropertyID], [DateCollected]) CREATE STATISTICS [_SBS_BLOG_stat_WMICollectedData_2_1_5] ON [dbo].[WMICollectedData]([DateCollected], [ID], [WMIInstanceID]) CREATE STATISTICS [_SBS_BLOG_stat_WMICollectedData_1_3_5_2] ON [dbo].[WMICollectedData]([ID], [StatusID], [WMIInstanceID], [DateCollected])

An optional optimization that you may use at your own risk is to add indexes.

Although this has worked well for me, I must say that this is tinkering with the original product design.  Regarding “sqlservr.exe *32 high CPU usage in SBS 2008″
This is the bit that will help optimize the database to take less processing resources by indexing some of the monitoring database tables.  Replace the code in your query window with the code below and press F5:

USE SBSMONITORING
GO
CREATE NONCLUSTERED INDEX [IDX_Alerts_GetAlertsPerID] ON [dbo].[Alerts] (    [DefinitionID] ASC,    [ComputerID] ASC,    [DateOccured] ASC,    [IsSet] ASC,    [ID] ASC )
GO
CREATE NONCLUSTERED INDEX [IDX_WMICollectedData_GetSecurityProductPerComputer] ON [dbo].[WMICollectedData] (    [WMIInstanceID] ASC,    [WMIPropertyID] ASC,    [DateCollected] ASC,   [ID] ASC )
GO

create index IDX_WMIObjectProperties_ObjectID on WMIObjectProperties(ObjectID,ID)
Go

create index IDX_WMIObjectInstances_ObjectID on WMIObjectInstances(ObjectID,ID)


SBSMonitoring_log.LDF size reduction

 The SBSMonitoring_log.LDF file should be 1GB or less, but has been known to grow over 30GB in some instances.  To reduce the size of this space eating monster, do the following:

Open SQL Server Management Studio Express by “RunAs” Administrator
Connect to the “[servername]\SBSMonitoring” database, use Windows Authentication
Expand Databases and then right click on “SBS Monitoring” and choose Tasks, Shrink, file.  In the window that opens, choose “Log” from the “File Type” drop down, click OK. 

Reducing the size of Windows\winsxs Folder

The winsxs folder is a PIG.  Open a command prompt in the administrative context
Run “compcln.exe”
After completion, you may notice up to 1.7GB of recovered space, but you won’t be able to roll back SP2.

Cleanup Licensing Log

The licensing log will take up a lot of space over time.  To reclaim that space:
Open a command prompt in the administrative context
Run: del “%systemroot%\system32\winevt\logs\Microsoft-Windows-Server Infrastructure Licensing*%4Debug.etl.*”


References:
Posted in Technical | Tagged , , , , , , , | Leave a comment